A Few Words on Photographing Guitars
I’ve
put together a few too many words about guitar photography. There is no
single correct or best way to create professional looking photos, or one
set of rules that apply in all circumstances.
So feel free to use what’s applicable and ignore the rest. I’ve
tried to keep this understandable, but you don’t need to comprehend
everything to shoot great photos with an iPhone!
PURPOSE
It probably makes sense to start by talking about the purpose of the photo. To say “use this type of light", "don’t use that type", or "shoot on an uncluttered background” doesn't have much meaning without knowing first if your primary interest is to illustrate details, show the guitar’s interior, or to create a more informal, “atmospheric” image in an environment that communicates a guitar's personality and feeling.
Are the photos for a book or for a web page? Are you looking to create "catalog” photos of an instrument on a simple white, grey, solid color, or graduated background, or with the background masked out, or “editorial” photos that create a mood.
With
"editorial" photos we can improvise and get lucky, but with "catalog"
style photos, , if you take photography seriously as an amateur or
professional, it always helps to know the rules to break them!
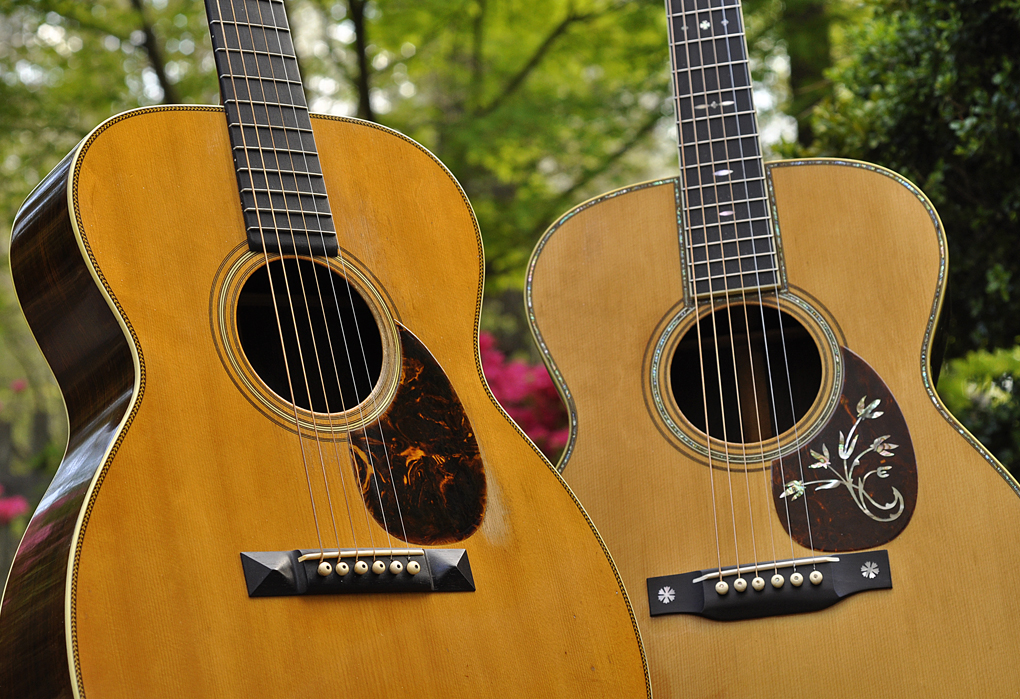
I
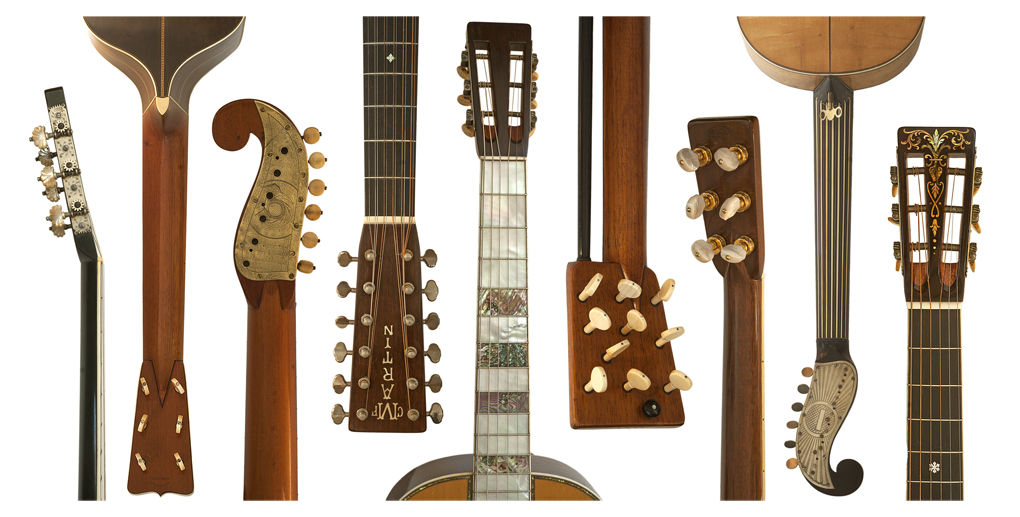
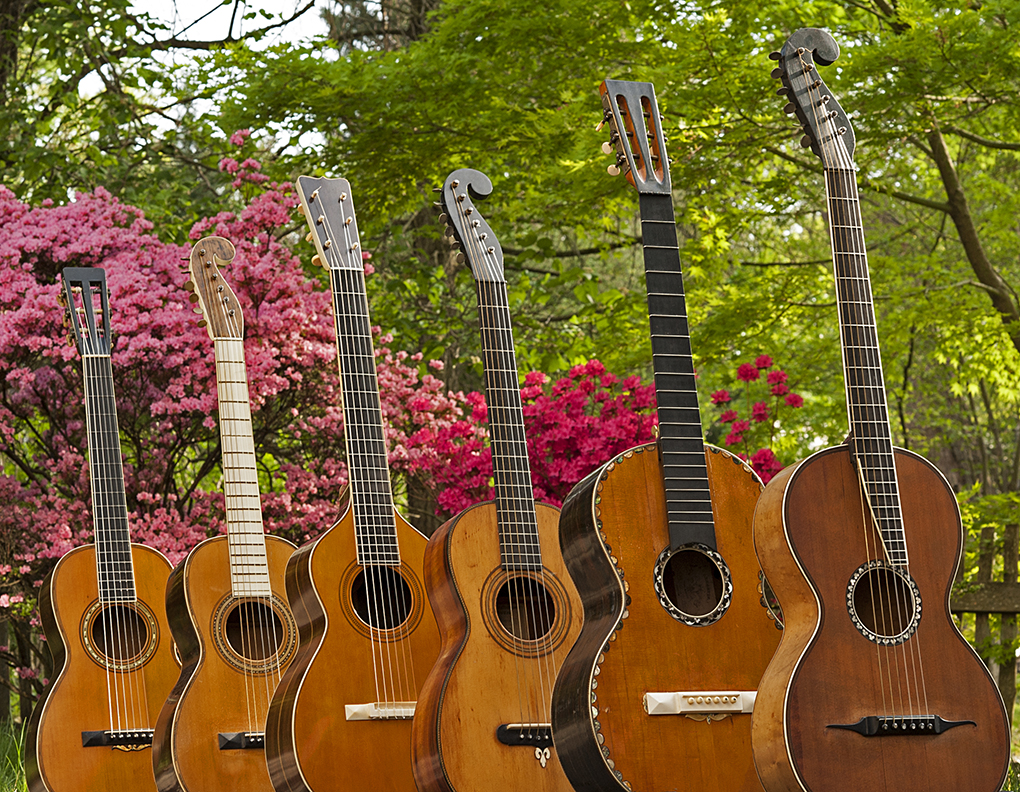
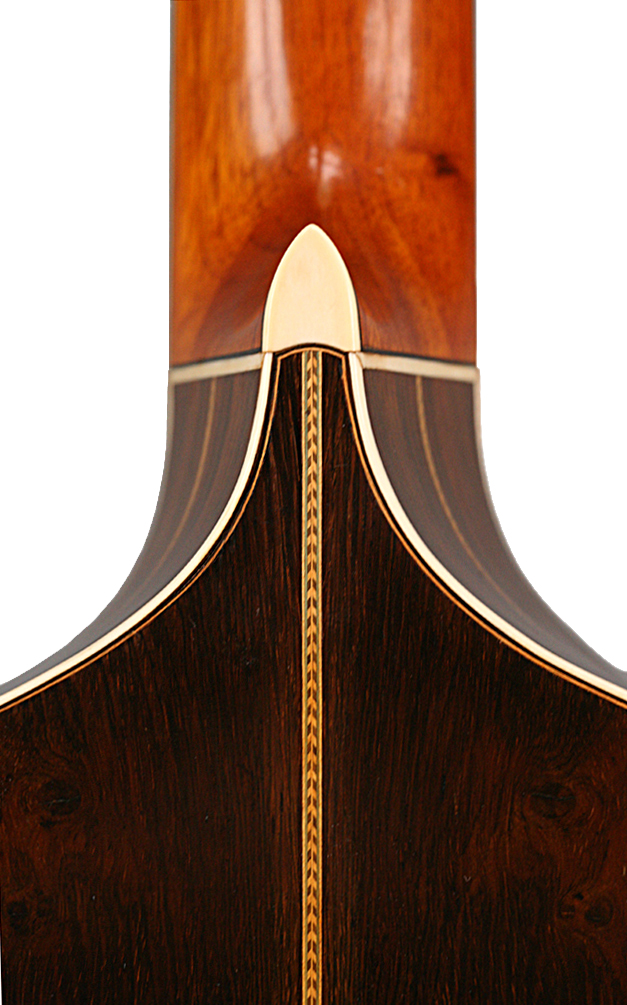
enjoy finding the personality in small parts of the guitar, and shooting
them like I'd shoot a portrait.
THE CAMERA
I own and use many cameras, from point and shoot to large format view camera, film to digital, Leicas and Nikons to the Hasselblad Super Wide. The best camera is the best one for the job, which may even be an iPhone. The best is often the one you have with you. Shooting in the studio provides many options, but out in the world, the equipment back home doesn’t help much. At times, quite honestly, I've needed to impress with expensive equipment to gain credibility and get the job. I've shot well received jobs with Nikons that I would not have procured if I could not have assured the client that I would show up with Hasselblads and know how to use them! There were times that it took a Hasselblad to gain the trust of a client to choose the camera that worked best.
My primary cameras these days are the new mirrorless Nikon Z6 and Z7, and I've been thrilled with the results so far.
Until
recently I was shooting with a Nikon D750 and was thrilled with the
results. I would have preferred the more professional D850, but
most of my shooting is in the field, and the higher end cameras can be
too heavy for my “experienced" neck and shoulders, while the “prosumer”
grade cameras provide virtually the same image quality in a body that is
still extremely durable, but not built to literally withstand wars as
the heaviest Nikons and Canons need to do.
The
D850, however was a game changer, with the resolution of a 2 1/4"
medium format Hasselbladd in a 35mm package.
Resolution is nice, but far more important is the depth of information
in the highlights and shadows. My personal Holy Grail in
photography has always been to expose to capture the detail in both
the near black shadows and near white highlights at the same time on a
sunny day. The D850 succeeds at this to an amazing degree.
Happily,
the Z7 is as light as a "prosumer" camera, with all the features and
durability of the most professional Nikons, and the best features of
the D850. The Z6 is nearly identical, with a few advantages and
disadvantages. The Z7 has the resolution of a medium format
Hasselbladd in a small and convenient package. The Z6 still has
resolution
that is still amazingly good , but having less information
to process allows it to be faster, making it better for sports and
other action work, and also giving world class performance in low
light. While the Z7 body is significantly more expensive it is
not necessarily "better" at all tasks. The Z6 also gives
superior video performance. The mirrorless camera's lenses are
also typically more compact and lighter than conventional lenses,
while the image quality is state of the art.
When digital Nikons were developed, the electronic sensor was roughly 2/3 the size of 35mm film. Today, Nikon and Canon offer 35mm cameras with both the original “DX” size sensors as well as “full frame” 35mm size "FX" sensors. The difference is dramatic. Once I was spoiled by the superior quality of the full frame D750, the DX Nikon D7000 was hard to go back to. Nikon now makes mirrorless cameras that are both full frame and "DX".
The
size of the sensor also changes the effective focal length of the lens.
With a DX sensor, a 200mm lens effectively becomes a 300mm, which can be
nice when greater magnification is helpful, but to achieve a wider
angle, you’ll need an 18mm DX lens to get the equivalent of a
traditional 28mm wide angle.
If you can't afford one of the new mirrorless cameras, I would
recommend at least getting one of the full frame models like the D750.
I highly recommend dpreview.com as a resource for information on all cameras, especially ones with interchangeable lenses for professionals and serious amateurs. imaging-resource.com is a very good source for point and shoot camera info. I also review the websites of B&H Photo Video and Adorama Camera in NY.
THE LENS
But
image quality ultimately depends on the lens, not the camera. And
surprisingly, the quality of an $1,800 Nikon mid-range zoom is actually
relatively horrible compared to the cheapest Nikon lens. Not much is
asked of a simple 50mm F2 lens, but a fancy high end lens requires many
compromises to do all we ask of it. Shoot a rectangular subject and you
will notice the tremendous amount of curvature and distortion at the
edges. I’ve used the same 55mm micro Nikkor lens with phenomenal results
for studio and copy work for over four decades. This is a “flat field”
copy lens designed to provide absolutely minimal distortion at the
edges, as well as being a high quality close up lens to capture the
tiniest details. This old lens can be bought used today for the price of
dinner. The 55mm micro was replaced many years ago by a 60mm, and is now
available in DX or FX versions. While A DX lens will only work properly
on the newer smaller sensor cameras, an old full frame, or FX lens, will
work with a Nikon of any age. While my old lens was designed for manual
focus only, the focusing of a micro lens is so critical that auto focus
is both unworkable and unnecessary anyway.
CAMERA SETTINGS: F STOPS AND SHUTTER SPEEDS
F stops and shutter speeds can sound intimidating, but involve only a few simple concepts and variables that are relatively easy to grasp.
If you picture a tube with light passing through, you’ll notice that the same quantity of light can pass through a wider opening for a short time as a smaller opening for longer.
Exposure is simply the amount of light reaching the sensor. In photography, the light is controlled by the size of the opening letting the light through (the lens aperture) and the length of time the light passes through (the shutter speed).
The longer the lens is open, the greater the opportunity for the camera to shake and move, creating a blurred photo. The longer the lens, the more critical this becomes. Picture a long lens capturing a narrow scene and note that a tiny shake is critical. The subject may not even remain in the photo. With a short lens capturing a wide scene, a small shake is less critical. As a rough rule of thumb, a 100mm lens requires 1/100 second, while a 500mm lens requires 1/500 second exposure to avoid excessive shake. Obviously, a fast moving train requires a shorter exposure than a still object. At times we may choose a slower shutter speed to intentionally show motion.
It helps to know how your individual lens type works best. The lowest ISO setting is often not the best for resolution. I shoot at ISO 400. And after paying $1,700 to be able to shoot at F2.8, you discover that F2.8 can give very fuzzy results. The lens compromises greatly to shoot that fast. The smallest aperture is not always the best either. The optimal aperture for your lens may be F5.6 or so.
A wider lens opening has the effect of creating narrower depth of field, while using the small sweet spot in the center of the lens gives greater depth of field, leaving more of the photo in focus. Depth of field tells you that, for instance, at F4 everything from six feet one inch away to six feet three inches away is in focus, while at F22 everything from ten feet to infinity is in focus. Narrow depth of field is ideal for portraits to let a face in sharp focus stand out against an uncluttered, fuzzy, out of focus background. Wider depth of field is ideal when you want an entire scene in focus. Longer lenses give shorter depth of field than wide lenses, making a telephoto lens ideal for portraits to make the face stand out.
Photography is essentially an exercise in using smaller apertures with longer shutter speeds or wider apertures with shorter speeds to achieve proper exposure while creating the effects we want.
In the old days we were required to purchase various types of film, each described by an ASA number, to expose properly in situations with more or less light. Purchasing a more sensitive and higher ASA film allowed us to take photos in lower light situations. Digital cameras allow us to adjust the sensor to be more or less sensitive to light by dialing in an equivalent ISO number. ISO 400 sets the sensor to expose properly with the same amount of light required by ASA 400 film. A higher ASA/ISO number comes with compromise in the form of a grainier image. Since we can usually control the amount of light when photographing guitars, we do well to set the camera to a lower number, typically 400.
PIXELS, JPGS and TIFFS, OH MY.
Folks tend to make a big deal about megapixels, but even my iPhone has the resolution of a pro grade Nikon from just a few generations ago. What’s more important, is the amount of information in the highlights and shadows, at the edges of the camera’s capabilities.
While today's cameras are great at capturing and delivering the range of dark to light tones on a guitar, they can still have troubles if lighting isn’t ideal,. This is why I've spent endless sunny days in the darkroom. My methods and thinking haven’t changed much in years since, but Photoshop has become my darkroom.
I recommend shooting at the highest resolution setting in RAW mode to provide the most amount of information to work with. I shoot in Nikon’s proprietary RAW mode which is the "NEF”. I “process” the images in Photoshop in TIF mode, the best mode for working. For highest quality, my final image is in "TIF” form for print, while a “jpg” is appropriate for the web.Another common mistake is saving a jpg as a jpg. Digital files are either “lossless” or “lossey” depending on whether they have been compressed or not. If your photo includes twenty seven pixels in a row that are totally black or white, the camera can either describe each of the seven consecutive pixels, or can say “gimme 27 of dese” to save time and space. Compressed files let you make compromises, "if a pixel is close enough, let’s call it black”. And you get to define how close is “close enough” by given it a label of 1 to 10 or 1 to 12. With 12, a pixel really needs to be black to be called black. With “5”, the file will be small, but anything close to the same is grouped together, so you will see the jumps from one shade of grey to the next. A number 8 compression will often look decent enough on the web, while still creating a small enough image file to allow the web page to load quickly and not get bogged down.
While
a #12 can sometimes be good enough for print in a pinch, the problem
comes when folks try to work in jpg mode. Don’t EVER save a jpg as a
jpg. Simply put, if you save a compressed image with more compression,
it will turn to mush. Better to work in TIF mode, save as a jpg as the
last step, and be sure to
instruct the recipient to save it back to TIF mode before any further
processing.
Remember, a compressed image loses information, while an uncompressed image is "lossless".
When I ask a client what their requirements are, they invariably say “300 dpi” (dots per inch, or pixels per inch). This reply is meaningless without also knowing the size the final image will be printed at. A 2” x 3” 300 dpi file won’t cut it if the image will be printed 8” tall. The one important thing to consider about pixels is to shoot an image with enough pixels for the final product. If the final product is an image on a billboard, you will need more pixels per inch than for a post card or a web page, or else the individual pixels will show.
PROCESSING
Half of the job of creating high quality fine art photos has always been done in the darkroom, and today that work is done with Photoshop. Adjusting colors, levels, contrast, and much more is an essential part of the job. But as they say "Garbage in, garbage out". Starting with a high quality photo is essential. Don’t count on the final product being great when the original is not.
LIGHTING / COLOR TEMPERATURE
All a camera does is capture light. Lighting a subject is an art form in itself, and can take a lifetime to master.
Photo studios generally use strobe lights to create light. A strobe is essentially a large flash. Since the flash of light only exists for a tiny fraction of a second, it’s impossible to see the results of the flash in real time. So the flash unit also contains a “modeling light”, simply a small light bulb to approximate the way the flash will light the subject and create shadows. Shooting with strobes used to be unnerving since we had to wait until the film came back from the processing lab to see how (or even if) the flash actually worked, so we also shot Polaroids to give a better approximation. Seeing a digital image immediately in the viewfinder certainly helps.
Today, a studio flash set up can be duplicated with two or three Nikon “on camera” flash units, using one or two of them off-camera. The flash units can communicate with each other, allowing you to say “light the subject perfectly with the left flash on full power, the bounced fill flash on the right at 1/2 power, and the “hair light” in back at 1/3 power, a calculation that used to take an advanced degree and hours.
A less expensive and perfectly practical alternative is the use of inexpensive clamp-on work lights. These can be had from Home Depot for $8 each, and you can use these with regular light bulbs. I would recommend daylight LED bulbs which can be had for $1 or $2. I used clamp-on lights every day professionally for years to create large format film for publication.
It used to be necessary to use special bulbs that were balanced for color, but these days it’s easy enough to dial in color adjustments in the camera. Just make sure that all of your lights are the same color temperature. Combining light sources of varying color temperatures in the same photo can cause lighting issues that are extremely difficult to correct. If you combine indoor and outdoor light in one photo, be sure to use "daylight" balanced bulbs inside.
At home, I rarely use lights at all any more. I do most of my shooting in my bright white kitchen under skylights. I love the diffuse quality of the natural light. It will limit you, however, to shooting when the weather cooperates. A busy shooting schedule may require artificial light. I'll put a sheet of foam core on the floor, and sometimes hang a sheet of foam core above to block the reflection of the skylights. Or I'll shoot the guitar in front of the bright white walls. I've used this kitchen set up with great results for photos for my web page, the Longworth book, and much more.
REFLECTIONS / DIFFUSION / GLARE / LIGHT ANGLE
Reflections are a major concern with catalog and copy work. The rule of thumb is simple. Place on the same plane as, and equidistant on either side of the camera, two lights creating a triangle, so the lights are aimed at the subject from 45º angles to eliminate reflections.
Some folks recommend fixing a polarizer to the lens to help eliminate reflections. A polarizing lens rotates until it eliminates light coming from one specific angle. Unfortunately, the continuous curved surfaces of the sides or heel can reflect an endless number of angles from many different directions, so eliminating reflection from only one angle has extremely limited value when shooting guitars.
If you use more than one or two light sources, you have light reflecting from that many angles to worry about, which is another reason to keep it simple. Sheets of white foam core strategically placed can be extremely useful to block the light from windows and such, to bounce light from a single light source to soften it, and to give a solid unbroken even surface to reflect off of. If a guitar is going to reflect, better to have it reflect a solid white surface than the cabinets in your kitchen. If the reflection from a white surface whitens the surface of the guitar, a sheet of black velvet can be useful instead of white.
For the shot of Clarence White's "Stringbender" on the cover of Fretboard Journal, I leaned the Tele against the railing on the back steps, and shot away. The only essential equipment is a good eye.
BACKGROUNDS
For photos of guitars in the Martin museum, I hung the guitars from a metal rod supported by two tripods with fishing line looped around the tuners, a few feet in front of a white seamless background, which is essentially a ten foot wide solid roll of paper which rolls down like toilet paper. For detail shots, I simply laid the guitars on white foam core and aimed the studio lights down. Where the white reflected on the sides or necks, I placed small sheets of black velvet out of the field of view. I set up studio lights in the museum and used umbrellas, which have a white fabric surface underneath, to diffuse the light. In the studio I use light boxes, fabric diffusers that surround the strobes, but the umbrellas are quicker to set up and break down.
You could also use a white bed sheet for a background, or white foam core. You don't need expensive equipment for excellent photos.
Most of the photos on my web site have the white background masked out. Even shooting on a white background leaves shadows that need to be removed in Photoshop, a tedious process. In the past few years I’ve been using the "Chroma Key” process, the same process used by the nightly news weather person, standing in front of a green screen onto which scenes are projected. This process is simpler than it sounds. Simply shoot against a piece of bright green fabric. Chroma-key green backgrounds can be had for $20 on Amazon. The bright green is simply easier for Photoshop to recognize and replace. You may need to do some selective color editing to remove some residual green reflections on the guitar. To make the work easier, I purchased the newest 12.9" iPad Pro and the application 'Astropad" to turn the iPad into a drawing tablet so I can draw directly on the image with an Apple Pen.
I have recently made another change. I am now shooing guitars on a large sheet of white plexiglass with lights underneath to help eliminate shadows, which has dramatically reduced the amount of Photoshop work necessary.
OUTDOORS / AVAILABLE LIGHT
If you’re going for atmosphere, you can’t beat the golden glow of the late afternoon sun. Shooting on cloudy or hazy days will help reduce the contrast of bright sun.
TRIPOD / SELF TIMER
Holding the camera motionless is essential to avoid a blurred image, even if you think your shutter speed is fast enough, so those in the know are always quick to recommend using a good stable tripod. Bogen/Manfrotto tripods are often recommended for professional quality at affordable prices. Choose a tripod and tripod head rated to suit the weight of the camera and lens. My #3221 works fine with the weight of my Nikon with a long telephoto lens. The tripod heads are sold separately. My #3160 is a video head, but has a quick release mechanism. Quick release plates already attached to each of my working cameras or lenses allow me to switch between cameras in a second or so.
Most professionals use a black tripod to help avoid having the tripod reflected in the image. I use the camera's self-timer to avoid the camera shake that can occur when pushing the shutter button.
INSTRUMENT
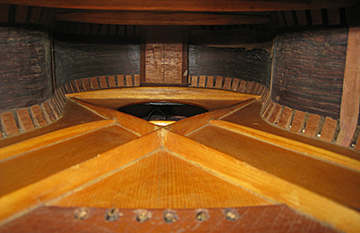
INTERIORS
For interior shots, I prefocus against the neck block from a distance the same as to the part I’ll be shooting. With the self timer set at 30 seconds, pressing the shutter button will both prefocus the camera and activate the timer. Then I’ll reach inside the guitar to place the camera in position, usually aimed at the bracing and/or bridge from a number of various angles. With the camera set to macro mode, the flash will not blow out the highlights as it typically does at close distances.
Feel free to let me know if you have any questions, and please let me know if parts could be clearer. I've tried to explain as much as I can to be as inclusive as possible without making this 20 pages long.
vintagemartin.com
To See Robert Corwin's Classic Photography of Folk and Roots Musicians, visit:
For Information on Photography for
Exhibition, Publication, CD's, Promotion, Web Pages, Tour Books,
to Purchase Photographic Prints, or
If You Have Questions or Suggestions About This Web Site or Vintage Martin Guitars:
e-mail: Robert Corwin
entire site copyright ©1998 through 2021 Robert Corwin/Photo-Arts. All rights reserved.